Creating Tours in Multiple Languages
December 11th, 2025
Tourient supports translating your tours into multiple languages. The app's interface will translate into 64 languages. See which languages Tourient supports.
Add a site
Before creating tours in multiple languages, we must first add a site in another language. To do this, contact your account manager. Requests are processed same-day during business hours.
The same process applies to add sites for multiple locations or organizations, as there are backend infrastructure tasks we need to handle when adding sites.
There are two ways to create tours in multiple languages. The method that is right for you depends on what your goal is.
If you want separate narratives for each language, where the tour is targeted to particular segments of your community, follow the steps in Method 1.
If you want direct word-to-word translations of tour text, in multiple languages, follow the steps in Method 2.
Method 1: Duplicate a Tour
In this method, we will duplicate a tour and its tour stops from one language site to another. Then, we'll replace its content in one language with content in another language. Let's say we have a tour in English, and we want to duplicate it for our Spanish site.
In the top navigation, click on Tours.
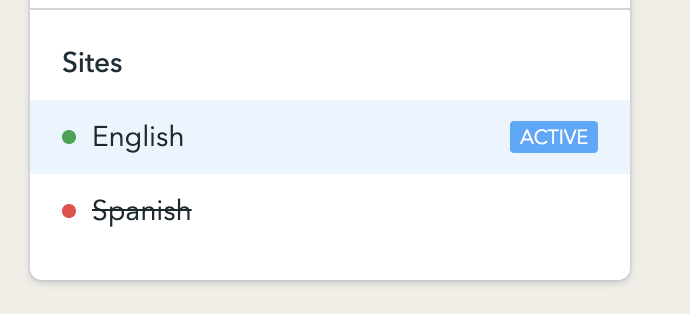
Click on the tour listing page for the tour you want to duplicate. On the right-hand side of the page, you'll see a Sites section.

Click on Spanish in the sites listing and wait a few seconds for the page to duplicate itself in another language. Repeat for additional languages as needed. We've duplicated our tour listing page.
Next, let's duplicate our tour stops. Return to Tours, and open each tour stop. Repeat step three by clicking on the language we want to duplicate this stop into in the Sites menu. Repeat for each tour stop.
At the top-middle of the screen, you’ll see a dropdown menu that says English. Click that, then click the language in which you want to create a tour. In our example, we'll click on Spanish. We see the duplicated tour and tour stops.

With our language switched to Spanish, we can now edit the content for the Spanish tour by replacing the English content with Spanish translations.
Click Save & Publish to save the changes for each page, continuing until all tour stops have been translated. That's all there is to it!
Method 2: Create Separate Tours for Each Language
In the top navigation, click on Tours.
At the top-middle of the screen, you’ll see a dropdown menu that says English. Click that, then click the language in which you want to create a tour.
Click the blue Create button at the top-right, then select Create a Tour in the dropdown menu.
Edit the tour details per the instructions on this page, and save the tour.
Return to the Tours listing, and click the three horizontal dots (…) to the right of the tour you just created. Click Add Child Entry to add a tour stop.
Edit the tour stop details per the instructions on this page, and save the stop.
Repeat steps 5 and 6 for however many stops your tour requires.
Additional Settings
Each language functions as its own site, with certain settings that will need to be edited for each language. Some site settings are translated for each language your tours are available in. These include:
Tour Settings
Custom Messages
Organization
Description
Land Acknowledgement Statement
Membership + Donations
All fields
Refer to the Settings article for instructions on editing those settings.